retina macbook pro & screenshots
A while back I got a new Macbook Pro with the flashy retina display. It’s probably the most powerful computer that I’ve ever owned, and the display made the pain of being forced from my usual 17” laptop to the smaller 15” laptop a whole lot easier to stomach (also man is this thing easier to carry around in my laptop bag!)
One of the things that’s proven to be a pain with it though is that all those extra pixels make for massive screenshots. This is made even worse when I try to take a screenshot then post it to this site. As of now I’ve made due with using the really great website Pixlr, but that isn’t really ideal because it’s an extra step, and I’m super lazy.
Unfortunately despite quite a bit of searching I haven’t found a solution that provides for the following requirements:
- Acts like the regular screenshot command (shift-command-4 in other words)
- Automatically scales the image quality down to something reasonable (I realize that ‘reasonable’ isn’t a great definition).
Honestly I don’t know if such a tool exists, and maybe the haziness of the second requirement makes it impractical. Still, if anyone out there has found something that would work, I’d love to hear about it.
In the meantime I think I’m going to give the following workaround for posting the screenshots to this page a try. It’s not perfect, because it means I’m using larger images than necessary, but at least it lets laziness prevail.
One of the cool features of Sphinx (the thing that renders the RST documents I write into the HTML that you see, by way of Tinkerer) is that you can specify image dimensions. This isn’t all that amazing honestly, since HTML has allowed for this for a while, but its still useful. So for now, I plan on posting my images as normal, and then using something similar to the following to make sure the image doesn’t look GIGANTIC on the page:
.. image:: /_static/images/example.jpg
    :width: 540px
Anyway, like I said its not optimal, and if I take any gigantic screenshots I’ll still use Pixlr to shrink them down before uploading them, but for most of my screenshots I think using the width should be fine.
If you have any other suggestions I’m all ears!
current python class & method in vim status line
I’ve been looking through some (awesome) third party modules lately, and while doing so I kept running into the same issue fairly often. Whenever I was looking at a module that had large classes (spanning multiple screens) I would find myself getting lost. For the longest time I’ve just sucked it up, but today I decided there has to be a better way! Enter the Python Helper vim plugin.
After downloading that module and dropping it into my .vim/plugin/ directory now whenever I’m in a python file it does this for me:
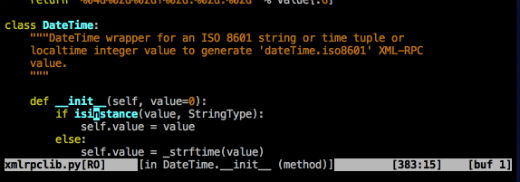
Sooo much easier, and now I can save some of the precious few brain cells I have for other things.
copy and paste without formatting
So one thing that’s been annoying me more and more lately is that when you copy and paste text from a style-aware (say Chrome) app to another style-aware (say Mail.app) app in Mac OS X that it copies the style. There are shortcuts you can use to paste without style, but in Mail.app the shortcut is Shift-Option-Command-V (which doesn’t seem like all that much of a shortcut to my fingers).
Anyway, I went hunting for how to fix this and I found a way. Here it is.
The CLI version didn’t work for me, but the System Preferences route worked like a charm.
Moving to S3
Sooooo I finally decided it was time to shut down the server I’ve ran for the past 8 years. In doing that I’ve had to start moving the various sites and services I ran on it to other places. That includes this site.
In the end, since this is a static website, I decided to go ahead and host it on Amazon S3, especially since they recently announced that they have given sites on S3 the ability to host their root zone as a website there.
So I went and looked for directions on Amazon’s website and found this walkthrough. It’s pretty easy to follow. The only slightly annoying thing is that you need to use Route53 for your nameservers, which meant I had to move it away from my registrar. That didn’t bother me too much in the end - I don’t have any particular love for GoDaddy these days, and the domain for this website is tiny.
So first things first. At first I considered writing my own script for pushing the files on my site up to Amazon. After playing with it in boto, I decided to have a look around and see what else was out there. That’s when I found s3cmd.
It filled all my needs, specifically the sync functionality. So I installed it on my Mac laptop using Homebrew. Once that was done, I went ahead and wrote a simple script that would handle a few things for me:
- Run Tinkerer to compile the static site.
- Updated my sitemap using the Google Sitemap Generator
- Call s3cmd to push my site up to S3.
I’ve gone ahead and pushed that script up to github (along with the rest of the site). You can find it here: s3push.
One other file that’s worth looking at is my .gitignore - I updated it so that I wouldn’t push my refreshed sitemap everytime I update the site.
Anyway, as you can see from the script, this is all super easy to do, and now you’re reading this site through the magic of S3.
Let me know if you have any questions or need a hand if you try to do the same and I’ll do my best!
Mountain Lion + Chrome + 2 Finger Swipe == ugh...
I’m not sure when it started happening, but recently I’ve noticed that when using the 2-finger-swipe to scroll left & right in chrome it sometimes instead choses to interpret that gesture as me wanting to either go back or forward in my browser history. Talk about annoying. Fortunately you can disable this, but rather than doing it in Chrome you have to do it System Preferences > Trackpad > More Gestures. The first option is ‘Swipe between pages’. Uncheck that and things go back to normal.